Android -明示的インテント-
明示的インテント
インテントを生成
インテント生成時に呼び出すアクティビティクラスを指定をします。
- Intent(Context packageContext, Class<?> cls)
呼び出すアクティビティのクラスを指定します。
パラメータ(追加情報)の設定
- Intent putExtra(String name, String value)
String型のパラメータ(付加情報)を付加します。
nameにキー、valueに値をセットで指定します。
次のアクティビティを呼び出し
- 戻り値がない場合
void startActivity(Intent intent) - 戻り値がある場合
void startActivityForResult(Intent intent, int requestCode)resultCodeは、リクエストコードを指定します。
リクエストコードとは、元のアクティビティに戻って来た時にどのアクティビティから 戻って来たか判断する為に付加する任意のIDコードです。
インテントの取得
- Intent getIntent()
パラメータ(付加情報)の取得
- Bundle getExtras()メソッドで、Bundleオブジェクト取得し、
String getString(String key)等でパラメータ値を取得します。
戻り値の指定
呼び出し元にアクティビティに処理を行ったかを通知するには、ActivityクラスのsetResult()メソッドを利用します。
- void setResult(int resultCode)
- void setResult(int resultCode, Intent data)
- resultCodeは、結果コードを指定します。
-
- Activity.RESULT_OK
- Activity.RESULT_CANCELED
dataは、パラメータ(付加情報)を保持するインテントを指定します。
アクティビティ終了
アクティビティ終了するには、Activityクラスのfinishメソッドを使用します。
- void finish()
これで、アクティビティの処理を終了し、最初のアクティビティに制御が移ります。
Androidにおける画面遷移という考え方は、次の画面に遷移するというより、新しい画面を 起動して元の画面の上に積み重ねて行くというイメージです。
この時、元の画面は、停止状態になり、新しい画面を閉じると、元の画面が復帰することに なります。
AndroidManifest.xmlへの追加
呼び出す側のActivityを認識させるためには、AndroidManifest.xmlへの追加記述が必要です。
明示的インテントのサンプル
明示的インテント(基本的呼び出し)
IntentEx3からPhotoActivityを呼び出すだけのサンプルです。

IntentEx3
res/drawable/image.png
AndroidManifest.xml
<?xml version="1.0" encoding="utf-8"?>
<manifest xmlns:android="http://schemas.android.com/apk/res/android"
    package="info.mito.intentex3"
    android:versionCode="1"
    android:versionName="1.0" >
    <uses-sdk android:minSdkVersion="8" />
    <application
        android:icon="@drawable/ic_launcher"
        android:label="@string/app_name" >
        <activity
            android:name=".IntentEx3"
            android:label="@string/app_name" >
            <intent-filter>
                <action android:name="android.intent.action.MAIN" />
                <category android:name="android.intent.category.LAUNCHER" />
            </intent-filter>
        </activity>
        <activity android:name="PhotoActivity" >
        </activity>
    </application>
</manifest>
※ ピンクの部分を追加します。
res/layout/main.xml
<?xml version="1.0" encoding="utf-8"?>
<LinearLayout xmlns:android="http://schemas.android.com/apk/res/android"
    android:layout_width="fill_parent"
    android:layout_height="fill_parent"
    android:background="#ffffff"
    android:orientation="vertical" >
    <TextView
        android:layout_width="fill_parent"
        android:layout_height="0dp"
        android:layout_weight="1"
        android:text="Activity呼び出しサンプル"
        android:textColor="#000000" />
    <Button
        android:id="@+id/start_btn"
        android:layout_width="fill_parent"
        android:layout_height="wrap_content"
        android:layout_gravity="center_vertical"
        android:text="呼び出し" />
</LinearLayout>
res/layout/photo.xml
<?xml version="1.0" encoding="utf-8"?>
<LinearLayout xmlns:android="http://schemas.android.com/apk/res/android"
    android:layout_width="match_parent"
    android:layout_height="match_parent"
    android:background="#ffffff"
    android:orientation="vertical" >
    <ImageView
        android:layout_width="fill_parent"
        android:layout_height="0dp"
        android:layout_weight="1"
        android:src="@drawable/image" />
    <Button
        android:id="@+id/back_btn"
        android:layout_width="fill_parent"
        android:layout_height="wrap_content"
        android:text="戻る" />
</LinearLayout>
IntetnEx3.java
import android.app.Activity;
import android.content.Intent;
import android.os.Bundle;
import android.view.View;
import android.view.View.OnClickListener;
import android.widget.Button;
public class IntentEx3 extends Activity {
  @Override
  public void onCreate(Bundle savedInstanceState) {
    super.onCreate(savedInstanceState);
    setContentView(R.layout.main);
    Button btn = (Button) findViewById(R.id.start_btn);
    btn.setOnClickListener(new OnClickListener() {
      @Override
      public void onClick(View v) {
        // Intentの生成
        Intent intent = new Intent(IntentEx3.this, PhotoActivity.class);
        // 次のアクティビィ起動
        startActivity(intent);
      }
    });
  }
}
PhotoActivity.java
import android.app.Activity;
import android.os.Bundle;
import android.view.View;
import android.view.View.OnClickListener;
import android.widget.Button;

public class PhotoActivity extends Activity {

  @Override
  protected void onCreate(Bundle savedInstanceState) {
    super.onCreate(savedInstanceState);
    setContentView(R.layout.photo);

    Button btn = (Button) findViewById(R.id.back_btn);
    btn.setOnClickListener(new OnClickListener() {

      @Override
      public void onClick(View v) {

        // アクティビティ終了
        finish();
      }
    });
  }
}
明示的インテント(付加情報をつけての呼び出し)
IntentEx4からHelloDoroidActivityを呼び出す時にEditTextから取得した値を付加します。
呼び出されたHelloDoroidActivityは、パラメータ(付加情報)を受け取り表示します。
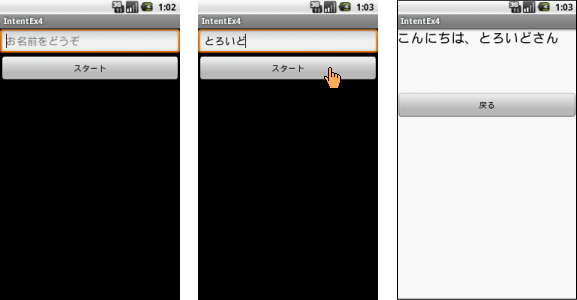
IntentEx4
AndroidManifest.xml
<?xml version="1.0" encoding="utf-8"?>
<manifest xmlns:android="http://schemas.android.com/apk/res/android"
    package="info.mito.intentex4"
    android:versionCode="1"
    android:versionName="1.0" >
    <uses-sdk android:minSdkVersion="8" />
    <application
        android:icon="@drawable/ic_launcher"
        android:label="@string/app_name" >
        <activity
            android:name=".IntentEx4"
            android:label="@string/app_name" >
            <intent-filter>
                <action android:name="android.intent.action.MAIN" />
                <category android:name="android.intent.category.LAUNCHER" />
            </intent-filter>
        </activity>
<activity android:name="HelloDoroidActivity" >
        </activity>
    </application>
</manifest>
※ ピンクの部分を追加します。
res/layout/main.xml
<?xml version="1.0" encoding="utf-8"?>
<LinearLayout xmlns:android="http://schemas.android.com/apk/res/android"
    android:layout_width="fill_parent"
    android:layout_height="fill_parent"
    android:orientation="vertical" >
    <EditText
        android:id="@+id/name_edit"
        android:layout_width="fill_parent"
        android:layout_height="wrap_content"
        android:hint="お名前をどうぞ" />
    <Button
        android:id="@+id/start_btn"
        android:layout_width="fill_parent"
        android:layout_height="wrap_content"
        android:text="スタート" />
</LinearLayout>
res/layout/droid.xml
<?xml version="1.0" encoding="utf-8"?>
<LinearLayout xmlns:android="http://schemas.android.com/apk/res/android"
    android:layout_width="match_parent"
    android:layout_height="match_parent"
    android:background="#ffffff"
    android:orientation="vertical" >
    <TextView
        android:id="@+id/name_text"
        android:layout_width="fill_parent"
        android:layout_height="wrap_content"
        android:layout_marginBottom="50dp"
        android:textColor="#000000"
        android:textSize="24sp" />
    <Button
        android:id="@+id/back_btn"
        android:layout_width="fill_parent"
        android:layout_height="wrap_content"
        android:layout_marginTop="30dp"
        android:text="戻る" />
</LinearLayout>
IntetnEx4.java
import android.app.Activity;
import android.content.Intent;
import android.os.Bundle;
import android.view.View;
import android.view.View.OnClickListener;
import android.widget.Button;
import android.widget.EditText;
public class IntentEx4 extends Activity {
  private EditText edit;
  @Override
  public void onCreate(Bundle savedInstanceState) {
    super.onCreate(savedInstanceState);
    setContentView(R.layout.main);
    // EditTextオブジェクト取得
    edit = (EditText) findViewById(R.id.name_edit);
    // Buttonオブジェクト取得
    Button btn = (Button) findViewById(R.id.start_btn);
    // Buttonオブジェクトリスナー登録
    btn.setOnClickListener(new OnClickListener() {
      @Override
      public void onClick(View v) {
        // EditTextの値取得
        String userName = edit.getText().toString();
        // Intentの生成
        Intent intent = new Intent(IntentEx4.this,
            HelloDoroidActivity.class);
        // インテントの付加情報の設定
        intent.putExtra("name", userName);
        // 次のアクティビィ起動
        startActivity(intent);
      }
    });
  }
}
HelloDoroidActivity.java
import android.app.Activity;
import android.content.Intent;
import android.os.Bundle;
import android.view.View;
import android.view.View.OnClickListener;
import android.widget.Button;
import android.widget.TextView;

public class HelloDoroidActivity extends Activity {

  @Override
  public void onCreate(Bundle savedInstanceState) {
    super.onCreate(savedInstanceState);
    setContentView(R.layout.droid);

    // インテント取得
    Intent intent = getIntent();

    // インテントの付加情報取得
    String user = "";
    Bundle extras = intent.getExtras();
    if (extras != null) {
      user = extras.getString("name");
    }

    // TextViewオブジェクト取得
    TextView userTest = (TextView) findViewById(R.id.name_text);

    // TextViewオブジェクトに表示する値を設定
    userTest.setText("こんにちは、" + user + "さん");

    // Buttonオブジェクト取得
    Button btn = (Button) findViewById(R.id.back_btn);
    // Buttonオブジェクトにリスナー登録
    btn.setOnClickListener(new OnClickListener() {

      @Override
      public void onClick(View v) {
        // アクティビティ終了
        finish();
      }
    });
  }
}
明示的インテント(戻り値あり呼び出し)
IntetnEx5からResColorActivityパラメータ付きで呼び出し、そこで取得した値を再び パラメータとして付加し、呼び出し元へ戻り、その結果を表示します。
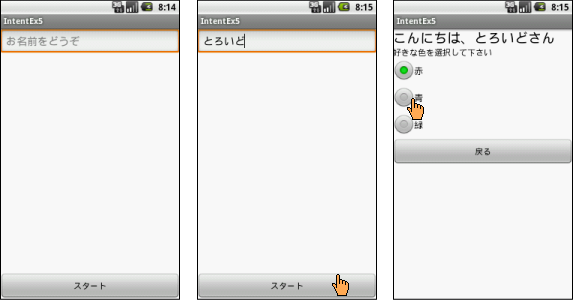
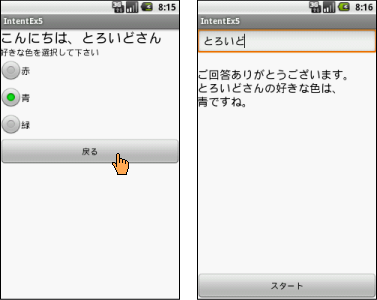
IntetnEx5
AndroidManifest.xml
<?xml version="1.0" encoding="utf-8"?>
<manifest xmlns:android="http://schemas.android.com/apk/res/android"
    package="info.mito.intentex5"
    android:versionCode="1"
    android:versionName="1.0" >
    <uses-sdk android:minSdkVersion="8" />
    <application
        android:icon="@drawable/ic_launcher"
        android:label="@string/app_name" >
        <activity
            android:name=".IntentEx5"
            android:label="@string/app_name" >
            <intent-filter>
                <action android:name="android.intent.action.MAIN" />
                <category android:name="android.intent.category.LAUNCHER" />
            </intent-filter>
        </activity>
<activity android:name="ResColorActivity" >
        </activity>
    </application>
</manifest>
※ ピンクの部分を追加します。
res/layout/main.xml
<?xml version="1.0" encoding="utf-8"?>
<LinearLayout xmlns:android="http://schemas.android.com/apk/res/android"
    android:layout_width="fill_parent"
    android:layout_height="fill_parent"
    android:background="#ffffff"
    android:orientation="vertical" >
    <EditText
        android:id="@+id/name_edit"
        android:layout_width="fill_parent"
        android:layout_height="wrap_content"
        android:hint="お名前をどうぞ" />
    <TextView
        android:id="@+id/res"
        android:layout_width="fill_parent"
        android:layout_height="0dp"
        android:layout_marginTop="20dp"
        android:layout_weight="1"
        android:textColor="#000000"
        android:textSize="20sp" />
    <Button
        android:id="@+id/start_btn"
        android:layout_width="fill_parent"
        android:layout_height="wrap_content"
        android:text="スタート" />
</LinearLayout>
res/layout/.xml
<?xml version="1.0" encoding="utf-8"?>
<LinearLayout xmlns:android="http://schemas.android.com/apk/res/android"
    android:layout_width="match_parent"
    android:layout_height="match_parent"
    android:background="#ffffff"
    android:orientation="vertical" >
    <TextView
        android:id="@+id/name_text"
        android:layout_width="fill_parent"
        android:layout_height="wrap_content"
        android:textColor="#000000"
        android:textSize="24sp" />
    <TextView
        android:layout_width="fill_parent"
        android:layout_height="wrap_content"
        android:text="好きな色を選択して下さい"
        android:textColor="#000000" />
    <RadioGroup
        android:id="@+id/radio_gp"
        android:layout_width="fill_parent"
        android:layout_height="wrap_content"
        android:orientation="vertical" >
        <RadioButton
            android:id="@+id/red"
            android:checked="true"
            android:text="赤"
            android:textColor="#000000" />
        <RadioButton
            android:id="@+id/blue"
            android:text="青"
            android:textColor="#000000" />
        <RadioButton
            android:id="@+id/green"
            android:text="緑"
            android:textColor="#000000" />
    </RadioGroup>
    <Button
        android:id="@+id/back_btn"
        android:layout_width="fill_parent"
        android:layout_height="wrap_content"
        android:text="戻る" />
</LinearLayout>
IntetnEx5.java
import android.app.Activity;
import android.content.Intent;
import android.os.Bundle;
import android.view.View;
import android.view.View.OnClickListener;
import android.widget.Button;
import android.widget.EditText;
import android.widget.TextView;
public class IntentEx5 extends Activity {
  private EditText edit;
  private TextView resColor;
  //リクエストコード
  private final static int REQUEST_COLOR = 0;
  // 改行文字
  private final static String BR = System.getProperty("line.separator");
  @Override
  public void onCreate(Bundle savedInstanceState) {
    super.onCreate(savedInstanceState);
    setContentView(R.layout.main);
    // EditTextオブジェクト取得
    edit = (EditText) findViewById(R.id.name_edit);
    // TextViewオブジェクト取得
    resColor = (TextView) findViewById(R.id.res);
    // Buttonオブジェクト取得
    Button btn = (Button) findViewById(R.id.start_btn);
    // Buttonオブジェクトリスナー登録
    btn.setOnClickListener(new OnClickListener() {
      @Override
      public void onClick(View v) {
        // EditTextの値取得
        String userName = edit.getText().toString();
        // Intentの生成
        Intent intent = new Intent(IntentEx5.this,
            ResColorActivity.class);
        // インテントの付加情報の設定
        intent.putExtra("name", userName);
        // 次のアクティビィ起動(リクエストコード付き)
        startActivityForResult(intent, REQUEST_COLOR);
      }
    });
  }
  //アクティビティ呼び出し結果の取得
  @Override
  protected void onActivityResult(int requestCode, int resultCode, Intent data) {
    if (requestCode == REQUEST_COLOR && resultCode == RESULT_OK) {

      String color = "";
      String user = "";
      // インテントからの付加情報取得するためBundleオブジェクト取得
      Bundle extras = data.getExtras();

      if (extras != null) {
        //String型のパラメータ(付加情報)取得
        user = extras.getString("user");
        color = extras.getString("color");
      }
      // TextViewのメッセージ作成
      StringBuilder sb = new StringBuilder();
      sb.append("ご回答ありがとうございます。");
      sb.append(BR);
      sb.append(user);
      sb.append("さんの好きな色は、");
      sb.append(BR);
      sb.append(color);
      sb.append("ですね。");
      // TextViewにメッセージをセット
      resColor.setText(sb.toString());
    }
  }
}
ResColorActivity.java
import android.app.Activity;
import android.content.Intent;
import android.os.Bundle;
import android.view.View;
import android.view.View.OnClickListener;
import android.widget.Button;
import android.widget.RadioButton;
import android.widget.RadioGroup;
import android.widget.TextView;

public class ResColorActivity extends Activity {

  String user = "";
  RadioGroup rg;

  @Override
  protected void onCreate(Bundle savedInstanceState) {
    super.onCreate(savedInstanceState);
    setContentView(R.layout.res_color);

    // 戻り値の指定
    setResult(Activity.RESULT_CANCELED);

    // インテント取得
    Intent intent_user = getIntent();

    // インテントの付加情報取得
    Bundle extras = intent_user.getExtras();
    if (extras != null) {
      user = extras.getString("name");
    }

    // TextViewオブジェクト取得
    TextView userTest = (TextView) findViewById(R.id.name_text);

    // TextViewオブジェクトに表示する値を設定
    userTest.setText("こんにちは、" + user + "さん");

    // RadioGrorpオブジェクト取得
    rg = (RadioGroup) findViewById(R.id.radio_gp);

    // Buttonオブジェクト取得
    Button btn = (Button) findViewById(R.id.back_btn);
    // Buttonオブジェクトにリスナー登録
    btn.setOnClickListener(new OnClickListener() {

      @Override
      public void onClick(View v) {

        // チェック済みのラジオボタンの取得
        RadioButton radioBtn = (RadioButton) findViewById(rg
            .getCheckedRadioButtonId());

        // チェック済のラジオボタンの値取得
        String colorName = radioBtn.getText().toString();

        // //////------戻り値の指定-------
        // Intentの生成
        Intent intent_color = new Intent();

        // インテントの付加情報の設定
        intent_color.putExtra("user", user);
        intent_color.putExtra("color", colorName);

        // 呼び出し元アクティビティに通知する結果コードの指定
        setResult(Activity.RESULT_OK, intent_color);

        // //////-------------------

        // アクティビティ終了
        finish();
      }
    });
  }

}